Pixelfork beginner guide
Master the basics with this Pixelfork beginner guide: learn prompt planning, smart credit management, and initial game generation step by step.
Hello! I'm haruka_apps, a Pixelfork Ambassador. In this Pixelfork beginner guide, I will walk you through the essential steps to turn your first idea into a playable build.
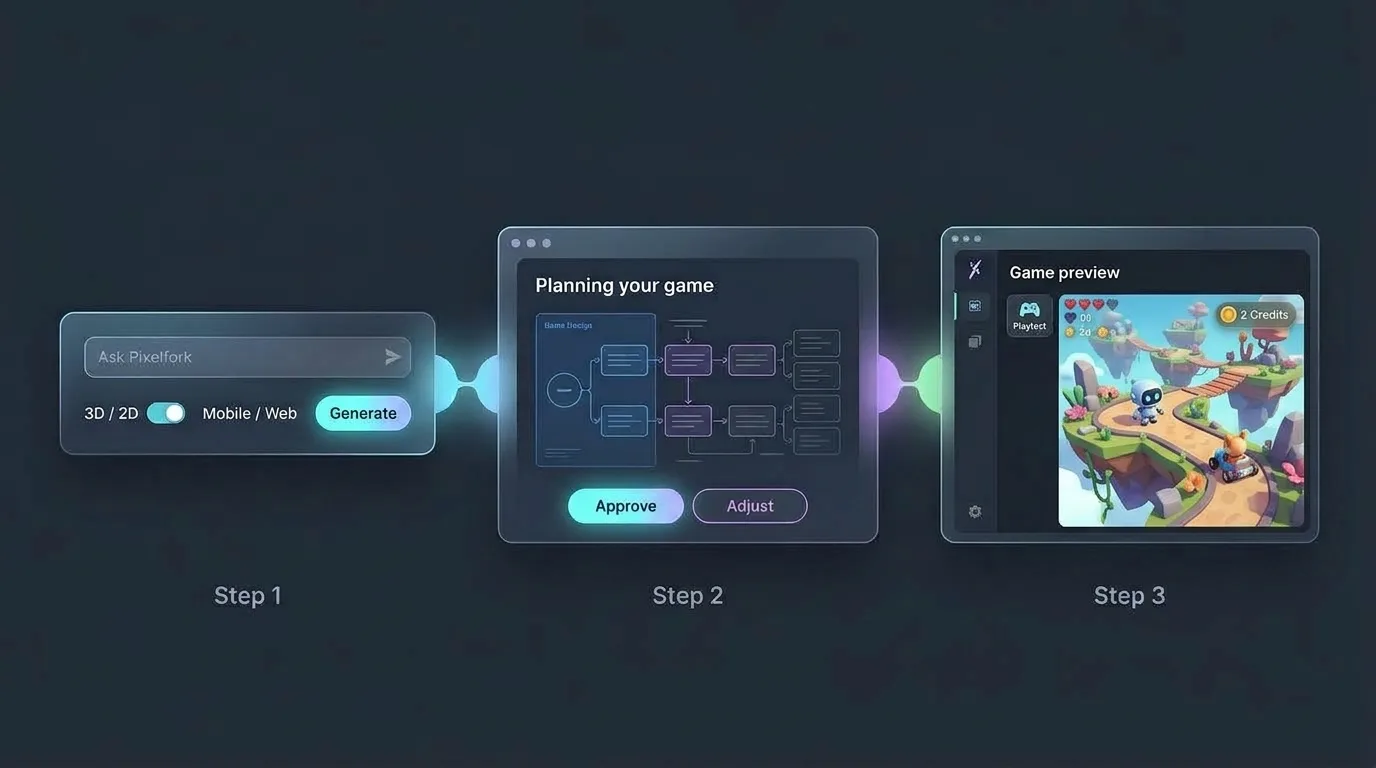
Step 1: Enter Your Game Concept and Start Generating
Start by heading over to the chat prompt—Ask Pixelfork—and type whatever game idea pops into your head.
Next, choose your gameplay style and target device:
Select game style: Choose either 3D Game or 2D Game.
Select device: Choose either Phone/Tablet (mobile) or Desktop/Web (desktop browser).
Once configured, click Generate.
Step 2: Fine-Tune Your Game Plan with Free Adjustments
Next, you will see a screen that says Planning your game, where the AI puts together an initial game design and technical outline. From here, you can choose either Approve or Adjust.
The key takeaway here is to use "Adjust" as many times as you like until you are completely satisfied:
Creating the initial plan and iterating with Adjust consumes zero credits.
While the plan defaults to English, you can tell the AI in the Adjust prompt to reply in your native language (e.g., "Please output the plan in Japanese") so you can review it comfortably.
Refine the concept with specific details—if you are making a racing game, for instance, you might request: "Make it feel much faster" or "Add a score-attack mechanic."
Once the blueprint looks solid, click Approve. A cutting-edge LLM (as of September 15, 2026, OpenAI's Astro is powering this) will generate the complete game code.
Step 3: Initial Generation and Playtesting
Generating your initial game uses 2 credits. Once completed, your playable build spins up right inside the preview panel on the right. For a complete overview of tiers and credit allocations, check our guide on Understanding Credits.
Jump right in and playtest it!
Take your time brainstorming in the free AI chat until you know exactly where to take the build next. Once you have a clear direction, submit your revision prompt to generate the next iteration (each updated game version costs 1 credit). If you run into any questions along the way, find quick answers in the Pixelfork FAQ.
Pro Tip: Structure Your Initial Prompt
While rough concept ideas work great, framing your opening prompt as a structured game design document (GDD) or requirements list makes the entire build process significantly smoother. As a quick workflow tip, I often draft detailed specification prompts using ChatGPT or Gemini before bringing them into Pixelfork.
I will break down practical prompt structures in an upcoming tutorial, so stay tuned!
Disclaimer: All features, LLMs, and credits are subject to change without prior notice.