Add Ads and IAP After an Android Studio Export
You exported the full Android project — now what? A realistic map of adding AdMob and in-app purchases to an AI-built game, and what work is actually left.

An AI editor gets you to a playable game quickly. Then you want money, and you hit a wall: there's no "add AdMob" button in a web editor, because ads and in-app purchases are native Android integrations. They live in an Android project.
That's exactly what the Android Studio project export is for. This guide maps the handoff: what you get, what's left to do, and the order that avoids a painful week.
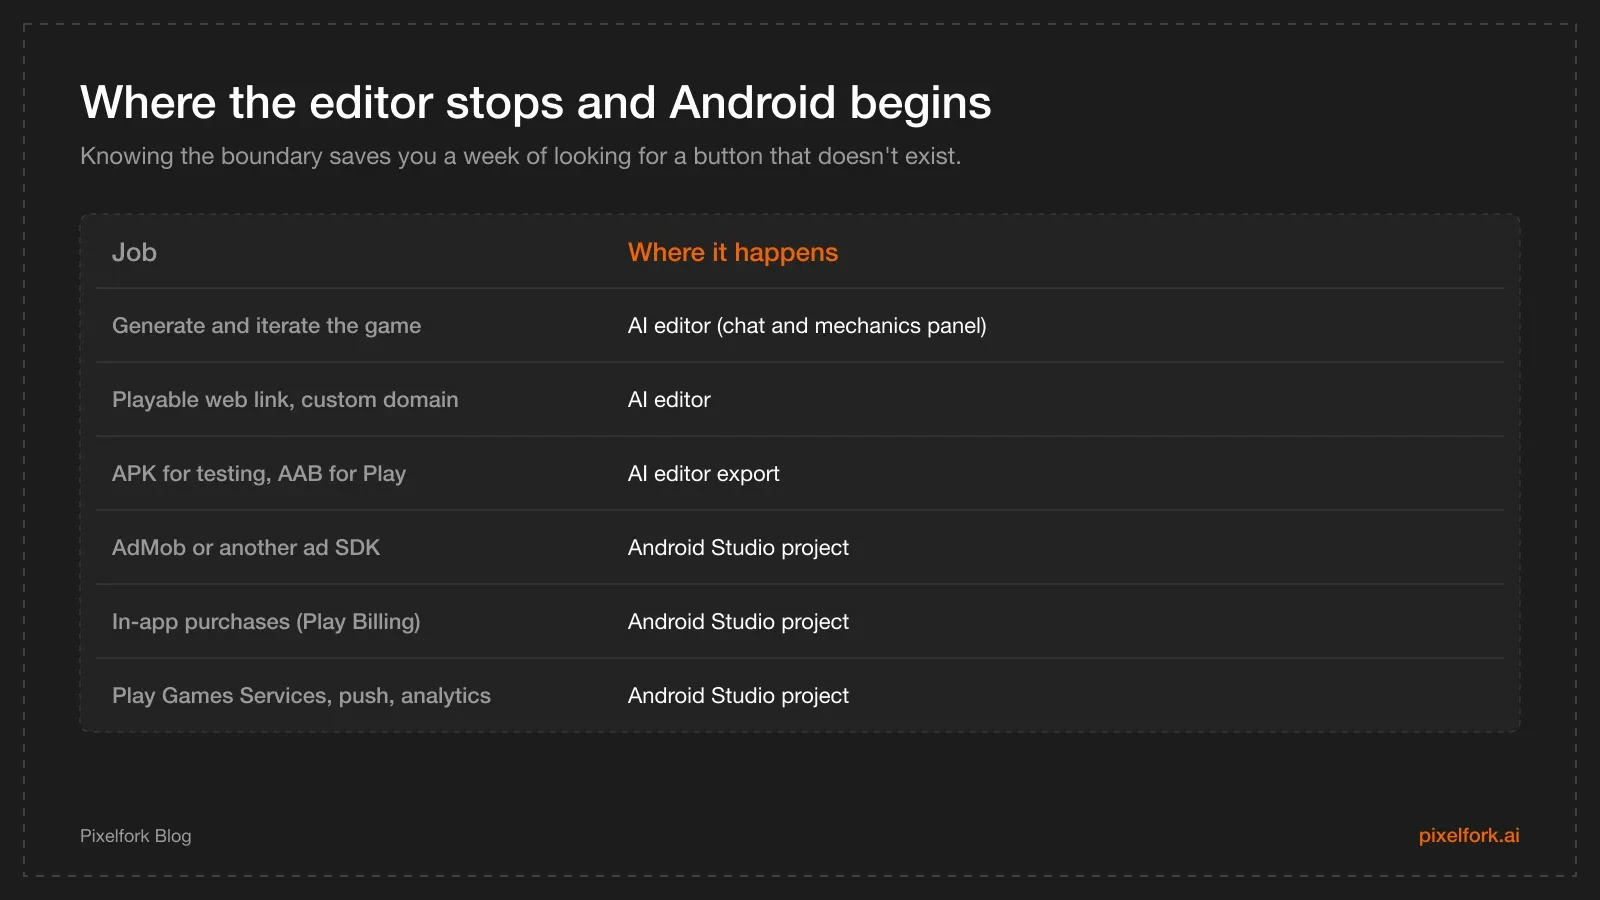
The boundary, drawn clearly.
What the export gives you
Per the Android Studio project export docs, you get the full underlying project rather than a finished file: the game's source, its assets and the Android project configuration, ready to open in Android Studio. From there you can add in-app purchases, ads such as AdMob, Play Games Services and any other native SDK.
What it is not: a one-click monetisation switch. Nothing is pre-wired, and that's the honest trade — you get a real Android project, and real Android projects need real integration work.
Before you add a single SDK
- Freeze gameplay. Every change you make in the AI editor after this point has to be re-exported and re-merged. Get the loop right first — the game-feel workflow is the cheap place to do that.
- Open the project and build it. Run a debug build on a real device before touching anything. If the untouched project runs, later breakage is yours to fix; if it doesn't, fix that first.
- Check the basics. Package name (you can't change it after publishing), app name, icons, version code and version name.
- Decide the model. Rewarded ads only? Interstitials at level end? A single "remove ads" purchase? Decide before you integrate, because the placement shapes the code.
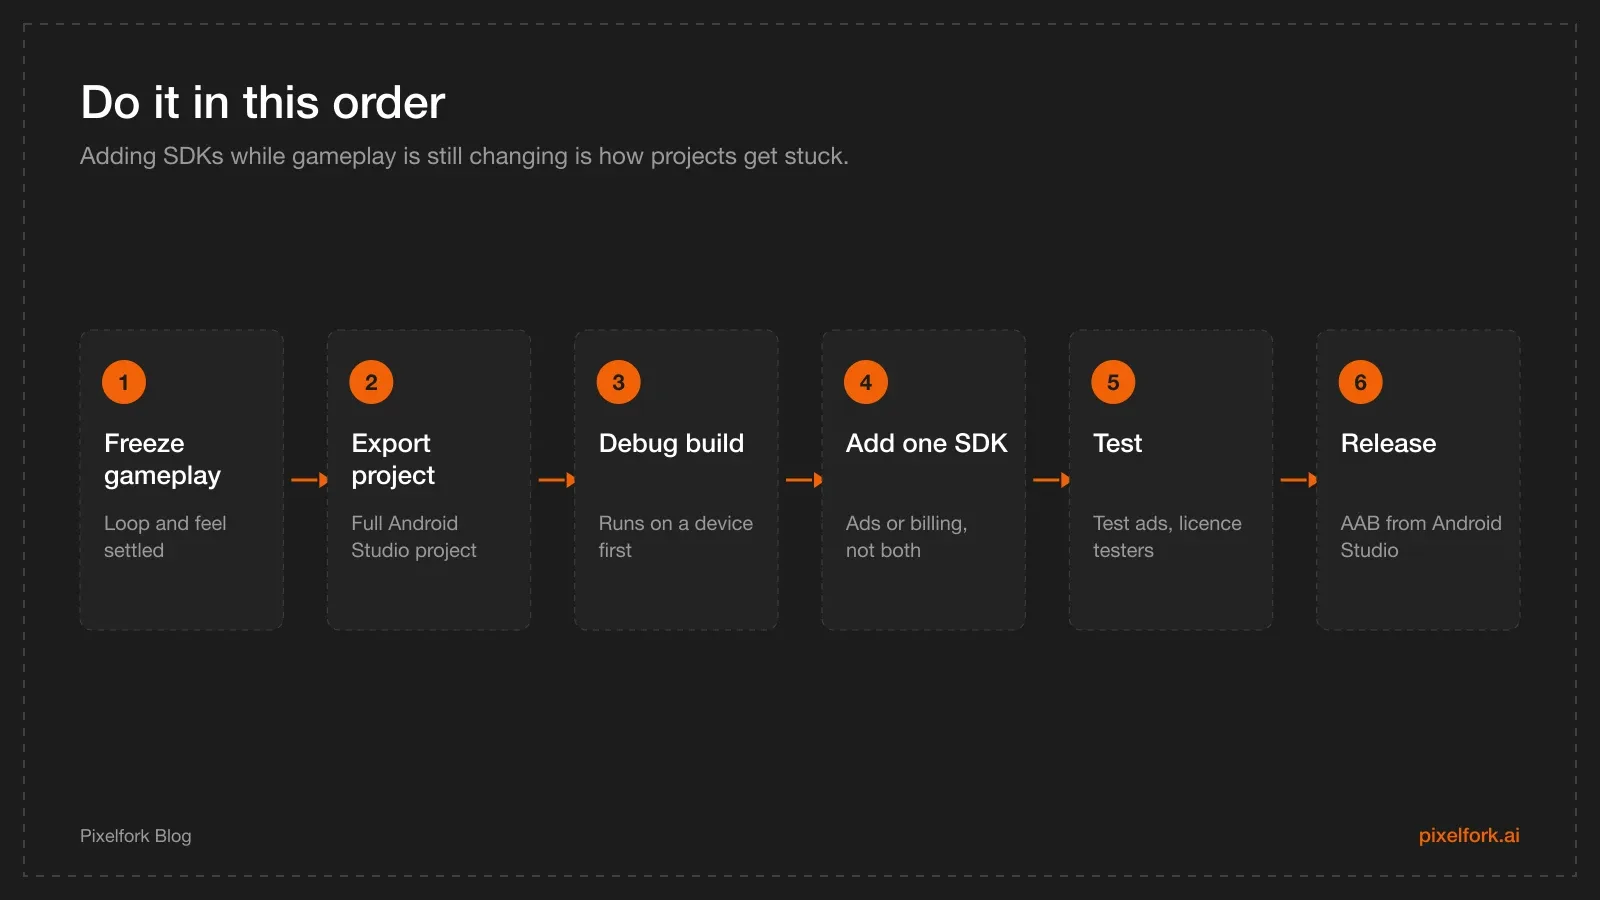
Six steps. Skipping step one is the classic mistake.
Adding ads, realistically
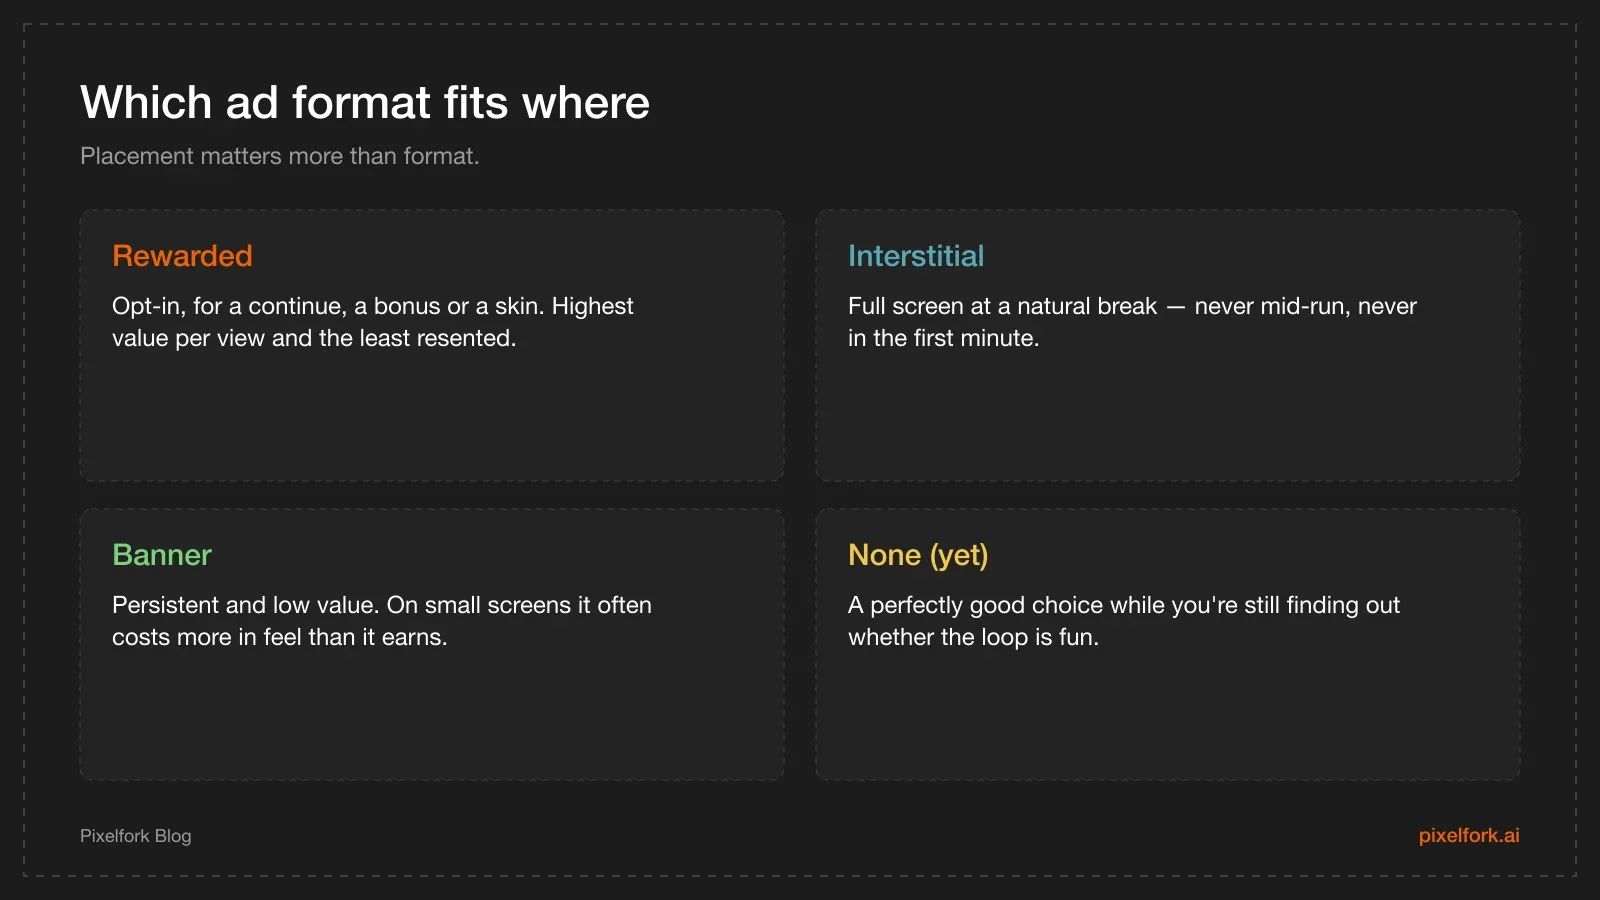
Formats, and where each one belongs.
The shape of the work with AdMob:
- Create an AdMob account and app, then create ad units for the formats you'll use.
- Add the SDK to the Android project through Gradle and set your app ID in the manifest. Follow Google's AdMob Android quick start rather than a blog snippet — the setup details change, and stale Gradle instructions are the number one cause of wasted evenings.
- Load and show ads at natural breaks. Preload while the player is busy; show at the end of a run or level.
- Always test with Google's test ads during development. Clicking your own live ads is a fast way to get an account suspended.
- Handle consent and privacy. You'll need a consent flow for users in regions that require it, and your Play data-safety answers must match what the SDK collects.
Design rules worth keeping: don't interrupt the first minute, never show a full-screen ad mid-run, and cap frequency. If you're deciding formats and placement in more depth, our monetisation strategies and ad mediation articles cover the trade-offs.
Adding in-app purchases, realistically
- Set up products in Play Console — a one-time "remove ads" unlock, a consumable currency pack, or both.
- Integrate the Play Billing Library in the Android project, following Google's billing documentation.
- Decide consumable vs non-consumable carefully. Currency is consumable; "remove ads" and permanent unlocks are not, and non-consumables must be restorable when a player reinstalls.
- Verify purchases properly and grant the item only after Play confirms. Never hand out a paid item on a button press alone.
- Test with licence testers in Play Console before you ship.
A "remove ads" purchase is the friendliest first product: it's simple to implement, easy to explain, and it rewards the players who like your game most.
Other native additions worth knowing
- Play Games Services for leaderboards, achievements and cloud saves — good retention hooks for arcade and hypercasual games.
- Analytics and crash reporting. Even a basic setup tells you where players stop playing.
- Push notifications. Useful, easy to overuse; save them for real events.
How to split the work
- Solo, non-coder: hire a freelancer for a few hours of SDK wiring once the game is finished. Hand over a working project, a written list of ad placements and the products you want — that's a well-defined job, not an open-ended one.
- Developer-founder: do it yourself with the official codelabs, and keep gameplay frozen while you integrate so you can tell which change broke what.
Either way, keep the AI editor as the place gameplay changes happen, and the Android project as the place production plumbing happens. Mixing the two is where projects get lost.
Ad placement design rules
Integration is the easy half. Placement is what decides whether players stay:
- Never in the first session minute. Let people find out if the game is fun before you interrupt them.
- Never mid-action. Full-screen ads during a run feel like punishment and hurt retention more than the impression is worth.
- At natural breaks. Level end, run end, menu return — moments where the player has already stopped.
- Cap frequency. A minimum gap between interstitials (measured in runs or minutes) is the single best lever you have.
- Make rewarded ads genuinely optional and genuinely rewarding. A continue, a double-score, a skin. If the reward feels compulsory, it's not rewarded — it's a paywall.
- Respect the back button and the pause state. Returning from an ad should never lose progress.
A realistic timeline
For a solo creator wiring monetisation into an exported project for the first time:
- Half a day to export, open the project and confirm a debug build runs on a device.
- Half a day to a day for the ad SDK: account, ad units, dependency, initialisation, one rewarded and one interstitial placement, test ads verified.
- A day for in-app purchases: products in Play Console, billing integration, purchase and restore flows, licence-tester verification.
- Half a day for consent and data-safety answers.
- A day for testing on real devices and fixing what breaks.
Call it three to four focused days for someone comfortable in Android Studio, or a small freelance job with a clear brief if you're not. Budget more if your gameplay is still changing — which is why the first rule is to freeze it.
Privacy, consent and data safety
Ad SDKs collect data, which means three obligations:
- A consent flow where regulations require it, shown before ads are requested.
- Accurate data-safety answers in Play Console that match what your SDKs actually collect. Update them when you add an SDK.
- A privacy policy that mentions your ad partner, hosted at a stable URL.
Getting this wrong is one of the more common reasons an update gets held up, and it's entirely avoidable.
Integration bugs that waste a day
- Testing with live ads. Use the SDK's test ad units during development. Clicking your own live ads risks your account.
- Loading an ad at the moment you want to show it. Preload while the player is busy, then show instantly.
- Blocking the first frame. SDK initialisation on the main thread at launch makes the game feel slow before it starts.
- Forgetting the restore path. Non-consumable purchases must survive a reinstall, or you'll get refund requests and one-star reviews.
- Granting the item on the button press. Always wait for Play's confirmation callback.
- Changing gameplay mid-integration. Re-exporting after the SDK work has started means merging two versions by hand.
Deciding what to sell
Before any code, decide the model. Three that work for small games:
- Ads only. Rewarded for bonuses, capped interstitials at run end. Best for short-session arcade and hypercasual games.
- Ads plus "remove ads". The friendliest paid product there is: one price, permanent, restorable.
- Cosmetics. Skins and themes that don't change balance. Slower to earn, kinder to the experience.
What to avoid in a first game: multi-currency economies, loot boxes and anything that makes a fair game unfair. They need tuning data you won't have until people play, and they attract policy scrutiny you don't need yet. The design side is covered in our monetisation strategies guide.
Keeping gameplay and native code in sync
Once the Android project has your SDK work in it, the exported project — not the web editor — is your source of truth for releases. Two habits keep that manageable:
- Put the project in version control the moment it opens and builds. Commit before each SDK change so you can bisect a break.
- Batch gameplay changes. If you must go back to the editor for a gameplay fix, do several at once, re-export, and merge deliberately rather than re-exporting weekly.
If you expect frequent gameplay iteration, delay the native work until the design is genuinely settled — the merge cost is what makes monetisation feel painful, not the SDKs themselves.
FAQ
Can I add AdMob without leaving the web editor?
No. Ad SDKs are native Android integrations, so they're added in the exported Android Studio project. The web editor's job ends at generating the game and packaging APK, AAB and the project itself.
Do I need to know Kotlin or Java?
Some. Following official quick starts gets you a long way, but you'll be editing Gradle files and Android code. Many solo creators hire a few freelancer hours for this step instead.
Will adding ads break my AAB export from the editor?
The editor's export doesn't know about changes you make in Android Studio. Once you've added native SDKs, build your APK and AAB from Android Studio — that project becomes your source of truth for releases.
What's the difference between exporting an AAB and exporting the Studio project?
The AAB is a finished bundle you can upload to Play as-is. The Studio project is the full source project you extend with native features and then build your own AAB from.
Can I do in-app purchases on the playable web link?
No. Play Billing is an Android feature. The web playable is for demos, feedback and marketing — see using a playable link as a landing page.
Is Play Games Services required to publish?
No. It's optional. Leaderboards and achievements can help retention in arcade games, but plenty of successful titles ship without them.
Get the gameplay right first, then hand it over: build and export your game on Pixelfork, and wire monetisation in the Android project when the loop is worth monetising.